Photo Tips
Got a topic you want covered? E-mail me with your questions.
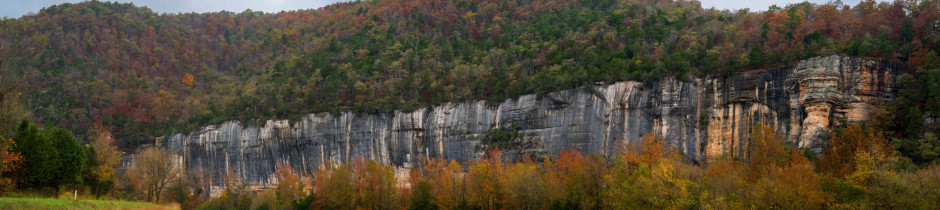
Composition: Prespective
This element of photography is one of the most simple, and most overlooked elements of composition, and yet it can have a dramatic affect on all our images. Remember, the goal we strive for is to capture an image that no one else has seen. Yet, far too often, we record an image as we normally see it: at eye level. In doing so, we fail to realize that every viewer, photographer or otherwise, sees the scene in the same way. As photographers, we travel great distances, to obscure locations, arrive at odd hours to take advantage of beautiful light, and, somehow, fail to move our cameras to record a unique composition. Even a slight change of perspective can turn a mundane image to a stunning shot. Try moving up, down, side-to-side, or a combination of these, and see what a remarkable difference can be made with minimal movement. This becomes especially true when using a tripod: we set it up so the viewfinder is at eye level, and forget that it is adjustable.
We all can think of a spot that has been photographed over and over, to the point that we feel like we can't add anything to what has been done before. Try visiting one of these spots and creating a fresh new image just by changing perspective; you may find something new in an old location.
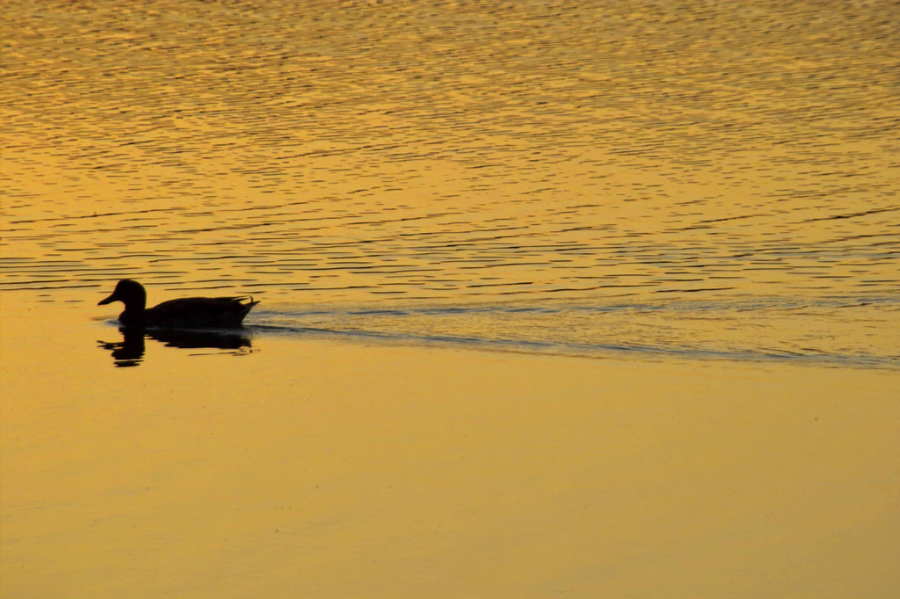
Composition: Rule of Thirds
What makes a great photograph? The answer to that question can be both simple and complex, oftern at the same time. Still, setting aside all the technical aspects of photography, the concept of Composition is basic to all outstanding photographs.
How does one achieve great composition? That answer is as varied as the photographer that takes the shot. Put five photographers in the same spot, and the result will be five very different images. Likes and dislikes, perception, and the "eye" all come in to play. And it is these differences that often draw the line between average and excellent.
So, let's begin with the first, basic rule of Composition: the Rule of Thirds. Simply put, this rule states that the main subject in any photo should not be placed in the dead center of the shot. Rather, if you would imagine a grid of two horizontal lines and two vertical lines dividing the screen into nine equal parts, like a tic-tac-toe grid, the subject should be placed at any intersection of those lines. (Some cameras provide the option of placing that grid in the viewfinder). By doing so, the viewer is encouraged to examine the entire subject, as well as the entire scene. When presented with a mirror image, the brain will tend to ignore half the image.
Not so sure about this? (I had one student argue at length against this rule). The next time you look at others' work, notice how this is used, not just in photographs, but paintings, movies and TV. In nearly every case, the Rule of Thirds, in some form, is applied. So, the next time you point your lens at a flower, or child, or bird, or sunset, try moving that subject away from the dead center; see if the image doesn't come alive.
Now, I know what you're saying to yourself: rules are made to be broken. True, but also true that you should be able to successfully follow a rule before you can successfully break it. Remeber, the overall goal of photography is to provide the viewer a compelling image, a personal viewpoint that most would not have imagined; this rule gives us a starting point that can lead to better photographs.
Preparation

If you've attended one of my photo classes, you've heard me talk about preparation. Planning when and where to take a photo, and being prepared well in advance. For this shot, I did just that. I hiked to the location earlier in the day, checked my iPhone app to verify the time and direction of the rising moon. I was there a day before the full moon to get more light on the river. Armed with that information, I hiked back well in advance of the moonrise, and got set up in a prime location. I cleaned my lens and sensor, and had even thought to bring a snack, which I enjoyed while waiting. The moon rose at exactly the time and place I had predicted, and I took multiple images. I left the location patting myself on the back for such careful, productive preparation. I had even remembered to bring a headlamp to light the trail on the hike out.
By now, you've probably noticed what I noticed when I opened the images on my computer: strange blotches in the sky. Although I had carefully cleaned everything (or so I thought), it appeared that dirt, and lots of it, had ruined the images. I finally realized that, at the last minute, I had added an ND grad filter to balance the light above the horizion. Sure enough, holding it up to the light showed it to be covered in dust. Most of the time I can remove dust specks from a shot, but the ND filter sits far enough from the sensor that the dust is magnified. So, an (almost) well-planned shoot was ruined.
What's the tip? Simple: plan COMPLETELY. Although it's not always possible to think of everything, keeping your equipment clean is a basic idea.
ISO
In this segment I''ll address another way of controlling exposure:ISO. This stands for International Standards Organization, and has its origins in film cameras. In the case of digital cameras, it defines the sensor's sensitivity to light. In simplest terms, the higher the ISO number, the more sensitive the sensor is to light. So if, after setting the Shutter Speed and Aperture, the camera meter indicates that the shot is still not exposed properly, the photographer can make the final adjustment by changing the ISO. Higher ISO, more light; lower ISO, less light. Simple, right?
Well, not exactly. This works fine when decreasing ISO, and to a point when increasing the ISO. When increasing ISO,at some point we will begin to see what is known as Noise. This will be noticed as a grainy look to the picture, and may include some odd colors added to the image. Photos may look like grainy newspaper pictures, and dark areas may include some purple. This may not be readily evident on the camera's screen or viewfinder, but will show up clearly on a computer screen or a print.
At what point does this happen? That depends on the camera. High-end, professional level cameras are capable of incredible ISO levels without noticeable Noise. They also cost incredible prices. Beginning- or mid-level cameras vary widely in their ISO capability, but nearly all of them display decent Noise control up to ISO 800. A definitive answer for any individual camera can only be reached by experimenting.
When using ISO as part of your overall Exposure adjustment, the simplest rule is this: ISO last. With ISO set at its lowest setting, make adjustments to Shutter Speed and Aperture first, and adjust ISO last if necessary. Using this rule will insure the highest quality image possible. At the same time, don't hesitate to experiment with ISO. Newer cameras, even moderately priced ones, have shown remarkable improvements in reducing Noise. Photo magazines always include ISO in their testing of new cameras.
Most current digital cameras will have a button dedicated to ISO somewhere on the camera body. A few will have this option in the menu. Adjustability differs from camera to camera, even those of the same brand; consult your owner's manual to find the correct procedure for your camera.
So remember: Shutter Speed + Aperture + ISO = Exposure
Camera Controls
Now that we've seen how the camera controls adjusts exposure, let's look at how we control it. At the top of most cameras you will find a knob with the letters AUTO, P, A (or Av on Nikon) , S (or Tv on Nikon) and M. It also may include small icons such as a moon, or a face. These icons are usually called Scene Modes, and are generic settings that, hopefully, will give the right exposure for a given situation. Except under ideal situations, they rarely work well. From this point forward, ignore them; all you need to know is containted in the following settings.
AUTO This is just as it says; the camera will automatically adjust exposure as best it can using Shutter Speed, Aperture, and (sometimes) ISO.
P Stands for Programmed Auto. Much the same as AUTO, but doesn't adjust ISO.
S (or Tv) Stands for Shutter Priority. The Photographer sets the Shutter Speed, and the camera will adjust the Aperture to achieve the correct exposure.
A (or Av) Stands for Aperture Priority. With the Aperture set by the photographer, the camera adjusts the Shutter Speed to balance the exposure.
M Stands for Manual Mode. In this mode the photographer sets the Shutter Speed, and Aperture
Now, I know what you're thinking: why would I go to the trouble of using anything but AUTO? If the camera can do it, why should I? After all, it's confusing, and I don't want to think about it. There is some validity to this way of thinking, to a point. As you become more advanced as a photographer, and begin to expect more out of your camera, at some point you will be faced with situation that calls for more control on your part.
Situations that call for controlling Shutter Speed.
- Freezing a moving subject- sports, birds, children, wildlife
- Creating the illusion of motion- flowing water, light trails
- Time lapse photography
- Extremely low light situations
Situations that call for controlling Aperture
- Increasing sharpness
- Including more detail
- Including less detail
- Creating sunburst effects
- Extremely low light situations
Got your attention? Have you tried, unsuccessfully, to take a shot in any of these situations? If not, as you become more self-analytical of your work, you will.
Some budding photographers never fully take control of their camera, and, as a result, see their photogrpahy stagnate. Trust me, I speak from experience; I opened up a new world of images by taking this step, and so will you.
Adjusting Exposure
Now that we have seen the ways that cameras measure light, let's examine how we can use that information.
It could be said almost without qualification that the one element that connects all great photos is great light. I've seen many well composed pictures (including my own) that are ruined by poor lighting. Sometimes this is the result of the light that is available at the time, but more often it's the failure of the photographer to use the information provided by the Exposure Meter.
So, how do we achieve great lighting? The first answer is to simply take photos at the right time of day. Avoid harsh, direct light, and shoot when light direction is more oblique: morning or evening times are best for this. Mid-day light, especially in the summer, can be impossible to overcome. No doubt many of us have taken shots on summer vacation that suffer from strong overhead light. (I know I have).
In the case of digital cameras, the amount of light that enters the sensor is adjusted in three ways: Shutter Speed, Aperture, and ISO. Let's look at each of those separately.
Shutter Speed refers to the length of time the shutter stays open: the longer it stays open, the more light that enters the camera. Shutter speeds range widely, from 1/1000 of a second to several minutes.
Aperture is the internal opening provided by the lens, and is indicated in increments referred to as f-Stops. The range of f-Stops depends on the lens used, but can range from f2.O to f22. Now comes the confusing part: a SMALLER number (f2, f4) means a LARGER opening, and therefore more light into the camera. A LARGER number (f18, f22) means a SMALLER opening, and less light entering the camera. If this seems confusing, well, it is. Even after many years of experience, I sometimes have to stop and think about this.
Lastly, ISO. This adjusts the sensor's sensitivity to light. ISO numbers range from 100 to 12,000 or much higher, depending on the quality of the camera. ISO has been the area of greatest improvement in digital cameras in recent years. My current camera can provide ISO settings in excess of 120,000. (For this, you will pay big bucks).
From these adjustments, we can reach the following formula:
Shutter Speed+Aperture+ISO=Amount of Light
By reading the Exposure Meter, and adjusting these three elements, we can, most of the time, get a well-exposed image.
Now, I know what you're thinking: why go to all this trouble? Why not just let the camera decide? (Which it will gladly do). And even if I do, how do I adjust these settings? Stay tuned, as that will be my next installment.
Exposure Meters
When applying any of the three metering methods, the camera will report the results, successful or otherwise, in several ways. Nearly all of the time, a scale will be displayed at the bottom of the viewfinder with a range of -3, through 0 to +3. The actual exposure is indicated on that scale by a pointer. A well-exposed picture will be indicated when the pointer is on or very near the zero on the scale. A pointer landing far to the left indicates an under-exposed image; one to the right indicates an over-exposed shot. If the pointer doesn't appear, and the scale is blinking, the photo is too dark or too light to take. (In this case, some cameras will disable the shutter, not allowing the photo to be taken; others will let the photographer take the shot in spite of the exposure.) Another method of displaying exposure results is the Histogram. The Histogram is a graphic representation of the entire amount of light in the shot; it looks a bit like a hill. A Histogram that peaks somewhere near the middle indicates a well-exposed image. One that peaks near the left is under-exposed; one that peaks near the right is over-exposed.
Many newer digital cameras provide a third method of determining exposure: Live View. As the name implies, the image seen in the viewfinder or on the screen comes directly from the camera's sensor, and shows exactly the image that will be recorded. This allows the photographer a great deal of control in deciding exposure, especially in high contrast situations. Given this information, the user can change the exposure, or re-frame the image without having to interpret a scale or histogram.
The newest breed of cameras, known as mirrorless, use this method exclusively. In all cases, the image displayed comes directly from the sensor. I'm currently using the Sony A7r II mirrorless, and find this method most helpful. In old computer lingo, WYSWYG. (What You See is What You Get). If a new camera is in your future, you might consider getting a mirrorless one; I feel that they are the future of digital cameras.
Spot Metering
The last method of metering I will adress is Spot metering. As the name implies, the camera uses a center spot, usually less than 10 % of the total image, to determine the exposure. The rest of the image is ignored, no matter how dark or light it may be. This method gives the photographer the most control of exposure, but must be used carefully. Instead of composing the picture and then setting the exposure using the other two methods, the user must place the center spot on the area of the image that best represents the correct amount of light, then adjust the camera accordingly. This method (the one I use exclusively) avoids the situation in which the camera is mis-led by large areas of bright light or darkness. As with any other method of metering, this will require a bit of practice. With time, this method can be the most useful in achieving well-balanced images.
Center-Weighted Metering
Center-Weighted metering gives the decision over exposure more to the photographer, and less to the camera. An area in the center of the picture, that is roughly 20 percent of the entire frame is used to meter light. The rest of the frame, although still part of the photo, is not taken into account when setting exposure. Using this smaller area, the camera evaluates the dark and light areas in the same way that it did with Matrix metering, and reports the result to the user; it just uses a smaller area. This can be helpful, as long as the photographer is aware that areas outside the center are still part of the exposure. In that the camera ignores them, they may wind up being over- or under-exposed. This technique is best used when the photo to be taken has a fairly large area that represents right balance of light. It can be quite useful in our example of a sunset. Metering the sun and its immediate surrounding area as the section considered, the camera will ignore the dark horizion, and avoid a washed-out, pale sunset. Center-Weighted metering represents a nice balance between user control and camera control.
Matrix or Evaluative Metering
In my previous entry, I approached the subject of exposure. In this segment, I'll begin to discuss this topic in more detail.
One element that all great photos share is great light; poor quality light can be the downfall of an otherwise excellent shot.
Photographs taken in a studio setting are carefully lit using a variety of floodlights and flash guns. However, those of us that choose to work in nature are wholly dependent on the light that nature provides. It's not uncommon for me to visit a location several times to find better light, or wait in one spot for the light to change. (Sounds boring, doesn't it).
So, let's look a bit more at how the camera measures light. This is known as metering.
As I pointed out earlier, most modern cameras employ three methods of metering light: Evaluative or Matrix, Center-Weighted, and Spot. Each method has its own strengths and weaknesses, and each can be useful in the right circumstance.
Evaluative or Matrix metering is the simplest, at least to the camera, and is usually the default method used. The camera simply meters all of the light entering the lens and reports that to the photographer. This method is most useful when lighting is even, with no extreme areas of dark or light. Days that are overcast provide the best results using this methods. (Many outdoor photographers prefer this type of lighting). Early morning, late afternoon and winter days can provide this even light as well. This method is less successful as the amount of contrast increases. The most common example of a high contrast scene is a sunset: the setting sun gives off intense light, while the horizon is entirely black. In Matrix metering, the camera doesn't care; it reads both areas of light, mixes them together, and comes up with a compromise. In this situation, the result is almost always disappointing, with the photograph rarely representing what was actually present, with one area (dark or light) outweighing the other. Dark areas will appear black, with no detail, while light areas will be almost white, also with no detail. (Light areas uch as these are said to be "blown out").
Solution? The best answer is to use Matrix metering when lighting is even across the entire scene. Any area that is much brighter or darker than the overall scene will skew the results. The next best answer is, given a high contrast scene, to compose the shot to include less of the contrasting areas. In the example of a sunset, composing the shot with less of the horizon will result in a better exposure of the sun (which is what we're shooting in the first place).
So, how do we include high contrast situations in our images? The answer is to use Center-Weighted or Spot metering, covered next time.